HMPL: Server-Oriented Customizable Templating for JavaScript
Simplifying Server-to-Client UI Rendering with Modern Tools

What is HMPL?
If you’ve ever worked on building websites or web applications, you know that getting the right content to display on a user’s screen can sometimes be complicated. You might have heard of tools that help with this, like templates or frameworks. HMPL (pronounced “humble”) is one of those tools—but with a focus on making things simpler, especially when it comes to communication between the server (where your website’s data lives) and the client (the user’s browser).
At its core, HMPL is a small template language designed to display user interfaces (UI) by sending requests from the client to the server and turning the server’s response into ready-to-use HTML. Think of it as a translator that helps your browser and server understand each other, so you can show the right content without writing tons of extra code.
What makes HMPL unique is that it’s “customizable”—you can set up exactly how these server requests work. It uses modern web standards, like the Fetch API (a built-in browser tool for sending and receiving data), and works with other popular tools: JSON5 (for handling data in a flexible way) and DOMPurify (for keeping your content safe from harmful code).
The best part? Using HMPL can make your JavaScript files much smaller. That means your website loads faster, and you can create UIs that look and work just as well as those built with bigger, more complex frameworks—without all the extra bulk.
If you find HMPL useful, consider giving it a star on GitHub. Your support helps the project grow and add new features!
A Simple Example of HMPL in Action
Let’s look at a basic example to see how HMPL works. This short piece of code shows how HMPL handles a request to a server and displays a loading message while waiting for a response:
<div>
  {{#request src="/api/my-component.html"}}
    {{#indicator trigger="pending"}}
      <p>Loading...</p>
    {{/indicator}}
  {{/request}}
</div>
What’s happening here?
-
The {{#request}}tag tells HMPL to send a request to the server at the address/api/my-component.html. This is where the server will send back the HTML content we want to display. -
Inside that, the {{#indicator}}tag withtrigger="pending"sets up a message (“Loading…”) that shows while the browser is waiting for the server’s response. Once the server sends the content, this loading message disappears, and the new content takes its place.
It’s a clean, straightforward way to handle getting content from a server without writing lots of JavaScript.
Basic Usage: Getting Started with HMPL
Let’s break down a simple but practical example to see how to use HMPL in your projects. We’ll create a button that, when clicked, updates a counter by getting the latest count from a server.
Step 1: Import HMPL
First, you need to bring the HMPL library into your project. If you’re using a modern JavaScript setup (like with Webpack or Parcel), you can import it like this:
import hmpl from "hmpl-js";
Step 2: Compile Your Template
Next, you’ll write a template using HMPL’s syntax and compile it. Compiling means turning your template into a function that HMPL can use to generate the actual HTML and handle interactions.
const templateFn = hmpl.compile(
  `<div>
      <button data-action="increment" id="btn">Click!</button>
      <div>Clicks: {{#request src="/api/clicks" after="click:#btn"}}{{/request}}</div>
  </div>`
);
Let’s unpack this template:
-
We have a button with an ID btnand adata-actionattribute set to “increment”. -
The {{#request}}tag here is set up to send a request to/api/clicks—this is where our server keeps track of the number of clicks. -
The after="click:#btn"part tells HMPL to send this request after the button (with IDbtn) is clicked. So every time the user clicks the button, HMPL asks the server for the latest click count. -
The result from the server (the current number of clicks) will appear where {{#request}}{{/request}}is in the template.
Pro tip: You can use the short version {{#r}} instead of {{#request}} to save typing!
Step 3: Handle the Request and Get the Result
Once your template is compiled, you need to create a handler that tells HMPL what information to send to the server when the request is made. Then you’ll get the final HTML element to add to your page.
const clicker = templateFn(({ request: { event } }) => ({
  body: JSON.stringify({ action: event.target.getAttribute("data-action") })
})).response;
Here’s what this does:
-
The function inside templateFnis called when the request is triggered (in this case, when the button is clicked). -
It receives information about the event (like which element was clicked) in the eventobject. -
We use event.target.getAttribute("data-action")to get the value of thedata-actionattribute from the button, which is “increment”. -
We wrap this in JSON.stringifyto turn it into a format the server can understand, and send it as thebodyof the request. -
The .responsepart gives us the actual HTML element that HMPL generates, which we’ve namedclicker.
Step 4: Add It to Your Page
Finally, we take the clicker element and add it to our webpage. Assuming you have a container with the ID app in your HTML, you’d do this:
document.querySelector("#app").append(clicker);
How It All Works Together
When the user clicks the “Click!” button:
-
HMPL detects the click event on the button with ID btn. -
It sends a request to /api/clickswith the data{ "action": "increment" }in the body. -
The server receives this request, updates the click count, and sends back the new count. -
HMPL takes the server’s response and updates the divthat says “Clicks:” with the new number.
The best part? You didn’t have to write complex code to handle the click event, send the request, or update the page. HMPL takes care of all that with a simple template.
Using HMPL Directly in HTML (No Extra JavaScript)
What if you want to use HMPL without writing a lot of JavaScript? You can do that by using the hmpl-dom module, which lets you work directly with your HTML file. This is great for simple projects or if you want to replace tools like Alpine.js or HTMX.
Here’s a complete example of an HTML file using HMPL this way:
<!DOCTYPE html>
<html lang="en">
  <head>
    <meta charset="UTF-8" />
    <meta name="viewport" content="width=device-width, initial-scale=1.0" />
    <title>HMPL Example</title>
  </head>
  <body>
    <main>
      <!-- This is where your HMPL template goes -->
      <template hmpl>
        <div>
          {{#request src="/api/my-component.html"}}
            {{#indicator trigger="pending"}}
              <p>Loading...</p>
            {{/indicator}}
          {{/request}}
        </div>
      </template>
    </main>

    <!-- Load the required libraries -->
    <script src="https://unpkg.com/json5/dist/index.min.js"></script>
    <script src="https://unpkg.com/dompurify/dist/purify.min.js"></script>
    <script src="https://unpkg.com/hmpl-js/dist/hmpl.min.js"></script>
    <script src="https://unpkg.com/hmpl-dom/dist/hmpl-dom.min.js"></script>
  </body>
</html>
Let’s see what’s different here:
-
Instead of writing JavaScript to compile the template, we use a <template hmpl>tag in our HTML. This tag tells thehmpl-dommodule that the content inside is an HMPL template. -
We include four scripts at the bottom of the page: -
json5: Needed for handling flexible data formats. -
dompurify: Keeps the HTML from the server safe by removing harmful code. -
hmpl-js: The core HMPL library. -
hmpl-dom: The module that automatically processes the<template hmpl>tags and mounts the content into the page.
-
When the page loads, hmpl-dom will find the <template hmpl> tag, process the HMPL code inside, and replace the template with the generated content. It will handle the request to /api/my-component.html automatically, showing “Loading…” while waiting for the server’s response.
This approach is perfect if you want to keep things simple—no need to write extra JavaScript to get your templates working.
Why Choose HMPL?
With so many tools available for building web UIs, you might wonder what makes HMPL stand out. Here are some key reasons why developers are choosing HMPL for their projects:
Smaller File Sizes, Faster Loads
One of the biggest advantages of HMPL is how much it can reduce the size of your application. When you use large frameworks, you often end up sending a lot of extra code to the user’s browser—code that might not even be needed for the current page. HMPL cuts down on this by handling much of the work through simple templates and server requests.
To give you an idea, here’s a comparison of app sizes (in bytes) between HMPL and other popular tools:
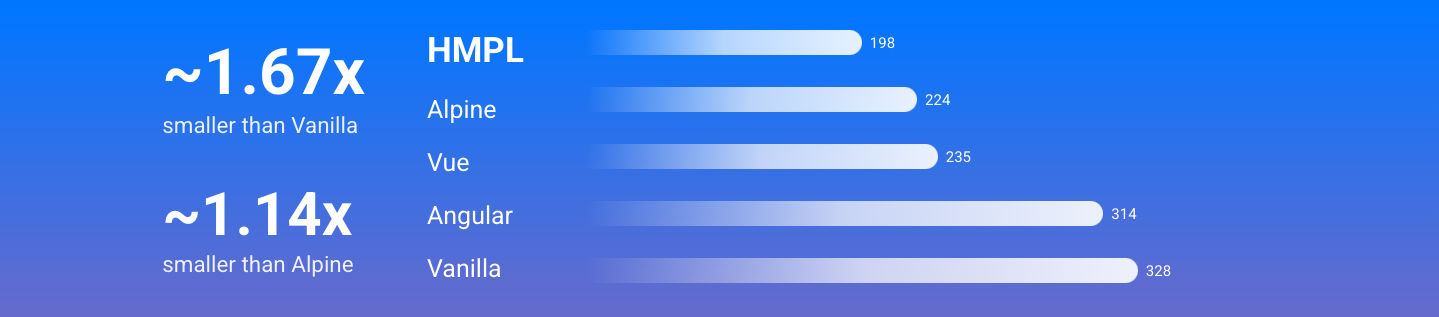
Smaller file sizes mean your website loads faster, which is better for user experience and even helps with search engine rankings.
Modern and Standard-Based
HMPL is built on top of the Fetch API, a modern, browser-native tool for sending and receiving data. Unlike some older tools that use outdated methods like XMLHTTPRequest, Fetch is designed to work well with modern JavaScript and is supported by all major browsers. This means you’re using a standard that’s here to stay, reducing the risk of compatibility issues.
Server-First Approach
HMPL is designed to work closely with your server. Instead of handling all the logic in the browser (which can slow things down), HMPL lets you get ready-to-use HTML directly from the server. This reduces the amount of work the client’s browser has to do and makes it easier to keep your UI in sync with your server data.
Flexible and Easy to Use
Whether you’re working on a small project or a large application, HMPL fits in. You can use it with just a few lines of HTML, or integrate it with more complex JavaScript setups. The syntax is simple and familiar, especially if you’ve worked with other template languages—no need to learn a whole new complex system.
Safe from Harmful Code
Security is a big concern when loading content from a server. HMPL uses DOMPurify, a trusted library that cleans HTML to remove any harmful code (like scripts that could steal data or damage your page). This means you can safely load content from your server without worrying about cross-site scripting (XSS) attacks.
Works with Popular Tools
HMPL plays well with other tools you might already be using. It integrates with JSON5, which makes it easier to write and read data objects in your templates. It also has plugins for build tools like Vite and Webpack, and even a VS Code extension to help with writing HMPL code.
Key Features of HMPL
Let’s take a closer look at the features that make HMPL a powerful tool for building web UIs:
Customizable Requests
You have full control over how requests to the server are sent. Need to send extra data? Set specific headers? HMPL lets you customize every part of the request, so it works exactly how your server expects.
Reduces Client-Side Code
By handling UI rendering through server requests and simple templates, HMPL cuts down on the amount of JavaScript you need to write and send to the client. This makes your codebase smaller and easier to maintain.
Built on Fetch API
Using the Fetch API means you’re working with a modern, promise-based system for handling network requests. It’s easier to use than older methods and integrates smoothly with other parts of modern JavaScript.
Server-Oriented Design
HMPL shifts much of the UI work to the server, where you can leverage existing backend logic and data. This reduces duplication between client and server code and makes it easier to keep your application in sync.
Scalable for Large Components
Whether you’re loading a small piece of text or an entire page, HMPL can handle it. You can generate thousands of DOM nodes from a single template, making it suitable for both small widgets and large sections of your app.
Simple Syntax
HMPL uses a block-based syntax with tags like {{#request}} that are easy to read and write. You don’t need to learn complex patterns or memorize lots of rules—even developers new to the tool can start using it quickly.
XSS Protection
With DOMPurify integration, HMPL automatically cleans any HTML received from the server, protecting your users from malicious code. This is especially important when loading dynamic content from external sources.
Flexible Integration
HMPL can be used in almost any project. You can include it via a simple script tag, import it in a modern JavaScript project, or use it with .hmpl files for better organization.
JSON5 Support
JSON5 makes working with data in your templates easier by allowing more flexible syntax (like comments, trailing commas, and unquoted keys). HMPL integrates with JSON5, so you can write data objects in a way that’s natural and easy to read.
Small Bundle Size
Despite all these features, HMPL is lightweight. The minified version is just a few kilobytes, so it won’t slow down your website.
How to Install HMPL
HMPL is easy to install, and you can choose the method that works best for your project. Starting from version 2.2.0, you’ll also need to include the JSON5 module, and from version 2.2.5, the DOMPurify module as well. Let’s look at the different installation options:
Using a Package Manager (npm, yarn, etc.)
If you’re using a package manager like npm (the most common one for JavaScript projects), you can install HMPL with a simple command. This method is best if you’re working on a project with a build system (like Webpack, Parcel, or Vite).
-
Open your terminal or command prompt. -
Navigate to your project folder. -
Run the following command:
npm i hmpl-js
Note: You’ll need Node.js version 10.12.0 or later installed on your computer to use this method. If you don’t have Node.js, you can download it from nodejs.org.
After installation, you’ll find the HMPL files in your project’s node_modules/hmpl/dist folder. There are two versions: a regular JavaScript file (hmpl.js) and a minified version (hmpl.min.js) that’s smaller and better for production.
Using a CDN (Content Delivery Network)
If you don’t want to use a package manager, you can include HMPL directly in your HTML file using a CDN. A CDN is a network of servers that host common libraries, making it easy to include them in your project without downloading anything.
The most popular CDN for JavaScript libraries is unpkg, but you can also use others like Skypack. Here’s how to include HMPL and its required dependencies using unpkg:
<script src="https://unpkg.com/json5/dist/index.min.js"></script>
<script src="https://unpkg.com/dompurify/dist/purify.min.js"></script>
<script src="https://unpkg.com/hmpl-js/dist/hmpl.min.js"></script>
You can add these script tags to the <head> or <body> section of your HTML file. It’s important to include them in this order because HMPL depends on JSON5 and DOMPurify.
For extra security, you can add integrity and crossorigin attributes to the script tags. These help ensure that the files haven’t been modified and are loaded securely:
<script src="https://unpkg.com/json5/dist/index.min.js" integrity="..." crossorigin="anonymous"></script>
<script src="https://unpkg.com/dompurify/dist/purify.min.js" integrity="..." crossorigin="anonymous"></script>
<script src="https://unpkg.com/hmpl-js/dist/hmpl.min.js" integrity="..." crossorigin="anonymous"></script>
You can find the latest integrity values on the unpkg page for each package.
Starting with a Starter Template
If you want to jump right in with a working project, there’s a starter template available that uses Vite (a fast build tool for web projects). Here’s how to use it:
-
Open your terminal or command prompt. -
Run the following command:
npx degit hmpl-language/hello-hmpl-starter hello-hmpl
This command creates a new folder called hello-hmpl with a basic HMPL project set up. Inside, you’ll find all the files you need to start building a web application with HMPL, including example templates and configuration for Vite.
-
Navigate into the new folder:
cd hello-hmpl
-
Install the dependencies:
npm install
-
Start the development server:
npm run dev
Your project will open in a browser, and you can start making changes to see how HMPL works in a real application.
The HMPL Ecosystem
HMPL has a growing ecosystem of tools and extensions that make it easier to work with. Here are some of the key ones:
VS Code Extension
If you use Visual Studio Code (a popular code editor), there’s an official HMPL extension that adds syntax highlighting, auto-completion, and other helpful features for writing HMPL templates. You can find it in the VS Code Marketplace by searching for “hmpl”.
![]()
Vite Plugin
Vite is a popular build tool for modern web projects. The vite-plugin-hmpl lets you import .hmpl files directly in your Vite project, making it easy to organize your templates. You can install it via npm:
npm i vite-plugin-hmpl --save-dev
![]()
Webpack Loader
For projects using Webpack (another popular build tool), there’s hmpl-loader—a loader that processes .hmpl files and converts them into usable JavaScript modules. You can install it via npm:
npm i hmpl-loader --save-dev
![]()
These tools help integrate HMPL into your existing workflow, making it even easier to use in your projects.
Getting Help and Support
If you have questions about using HMPL, there are several resources available to help you:
Documentation
The official HMPL documentation is the best place to start. It covers all the basics, from installation to advanced features, with clear examples and explanations.
GitHub
The HMPL GitHub repository is where the project is developed. You can:
-
Check the “Discussions” section to ask questions and share ideas with other users. -
Look at the “Issues” section to see if your problem has already been reported, or to report a new bug. -
Browse the source code to learn more about how HMPL works under the hood.
Discord
There’s an official HMPL Discord server where you can chat with other users and the development team. Join the support channel to ask questions and get help in real time.
Twitter (X)
Follow @hmpljs on Twitter for updates, tips, and news about HMPL. It’s a great place to stay informed about new features and community projects.
Stack Overflow
You can also ask questions on Stack Overflow using the hmpl tag. Be sure to include details about your problem and any code you’ve written, and the community can help you find a solution.
Contributing to HMPL
HMPL is an open-source project, which means anyone can contribute to making it better. Whether you’re a developer, designer, or just someone who uses HMPL, there are ways to help:
-
Report bugs: If you find a problem with HMPL, let the team know by creating an issue on GitHub. -
Suggest features: Have an idea for a new feature? Share it in the GitHub Discussions. -
Write documentation: Help improve the docs by fixing errors or adding examples. -
Contribute code: If you’re a developer, you can submit pull requests with bug fixes or new features.
The project has a Contributing Guide that explains the process in detail, including how to set up your development environment and submit your contributions.
A big thank you to everyone who has already contributed to HMPL and its related projects—your help makes the tool better for everyone!
What’s Next for HMPL?
The HMPL team has a clear roadmap for future development, which you can view on the GitHub Projects page. This roadmap includes planned features, improvements, and bug fixes, so you can see what’s coming next.
Some of the things you might see in future versions include better integration with popular backend frameworks, more advanced caching options, and additional tools to simplify common workflows.
License
HMPL is licensed under the MIT License, which is a permissive open-source license. This means you can use, modify, and distribute HMPL in both commercial and non-commercial projects, as long as you include the original copyright notice.
You can read the full license text in the LICENSE file on GitHub.

Whether you’re building a small website or a large web application, HMPL offers a simple, efficient way to handle server-to-client UI rendering. With its focus on small bundle sizes, modern standards, and ease of use, it’s a tool worth considering for your next project. Try it out, explore the examples, and join the community to see how HMPL can simplify your workflow!
