From Messy APIs to One Plug-and-Play Panel: A Practical Guide to ContextForge MCP Gateway
If you have half-a-dozen AI micro-services scattered on different ports, with separate authentication rules and no unified logging, ContextForge MCP Gateway turns them into a single, tidy socket strip.
Everything in this article is taken straight from the official GitHub repository—no extra sources, no hype.
Table of Contents
-
Why MCP? Why a Gateway? -
Five-Minute Quick Start with Docker -
Beyond the Basics: Wrap Any REST Endpoint as an MCP Tool -
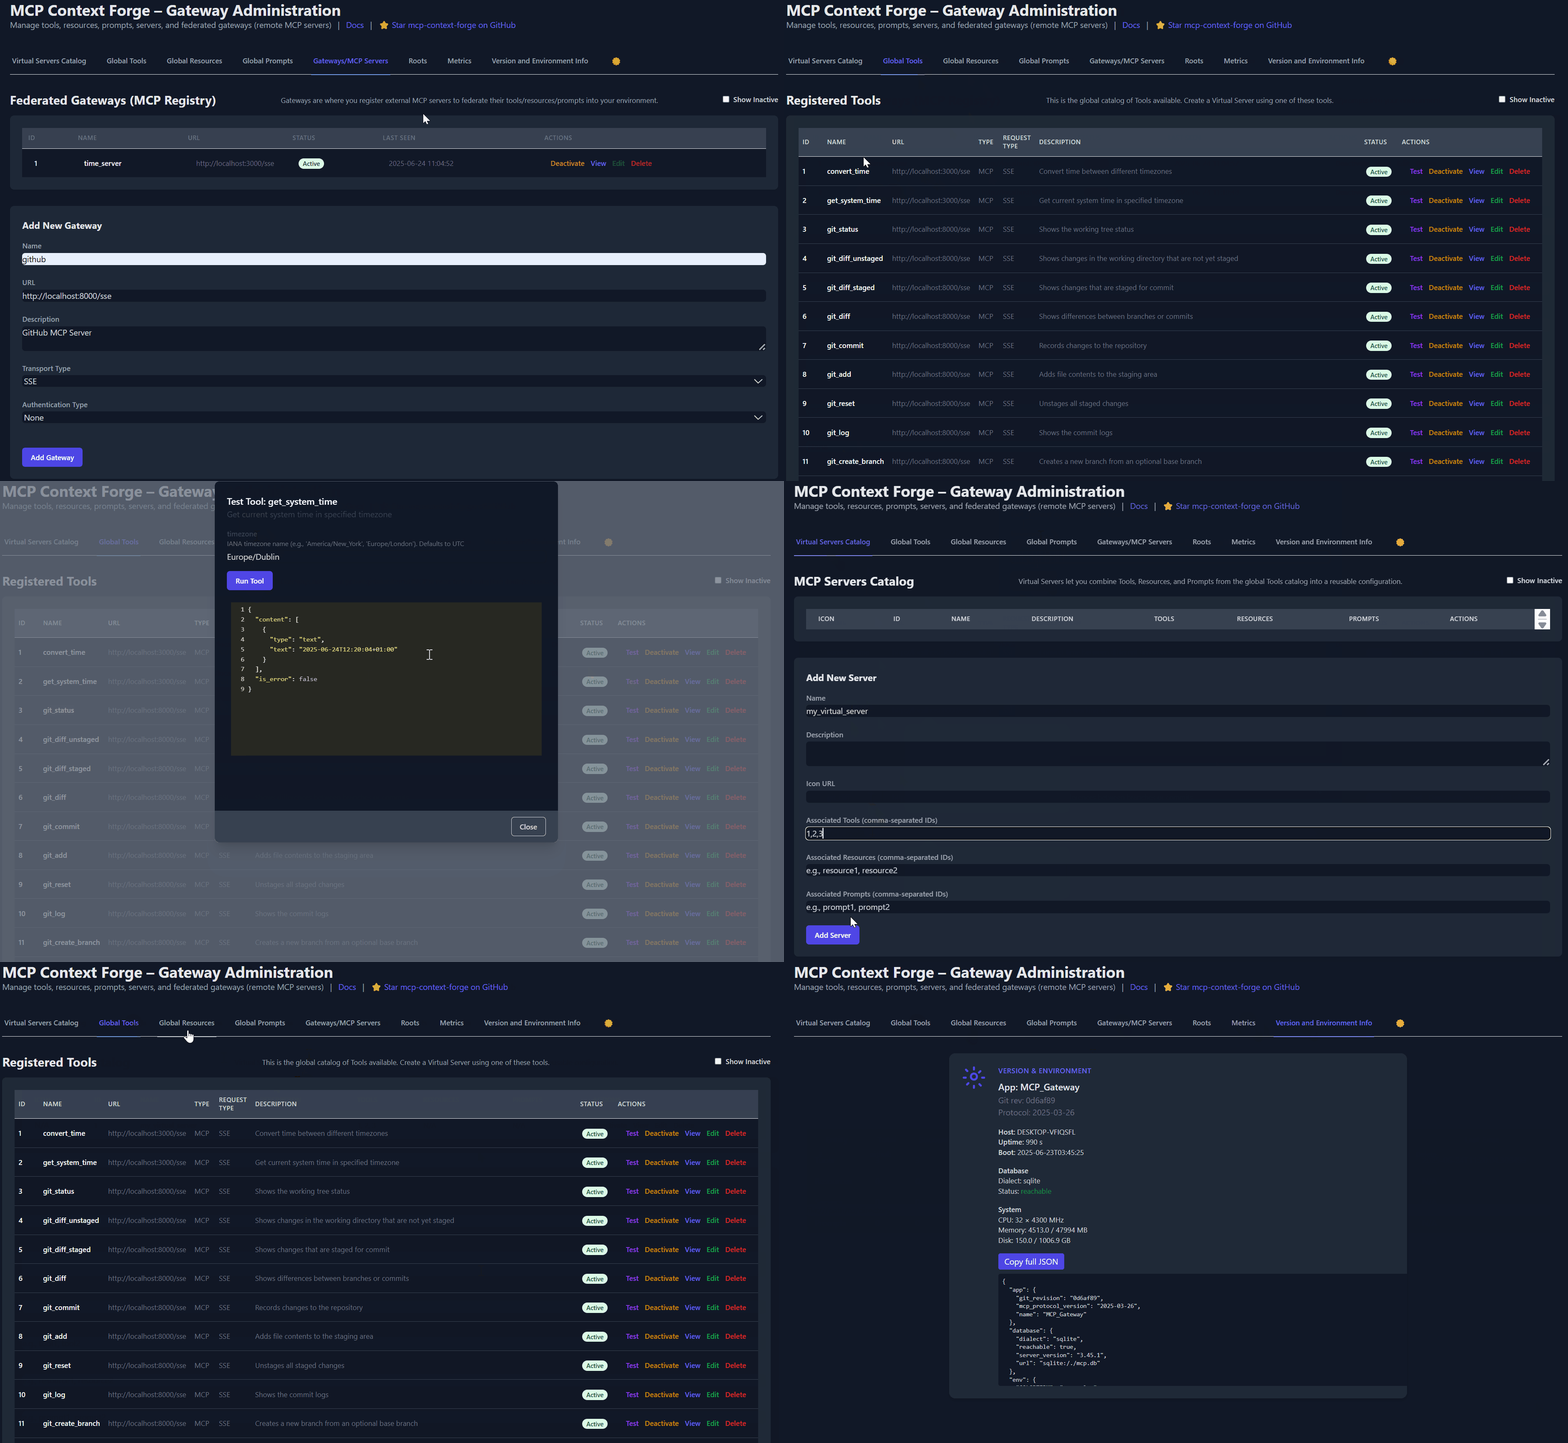
One Dashboard to Rule Them All: Admin UI & Virtual Servers -
Observability & Troubleshooting: Logs, Metrics, Common Pitfalls -
Global FAQ
1. Why MCP? Why a Gateway?
| Term | One-Sentence Explanation |
|---|---|
| MCP (Model Context Protocol) | The “USB-C for AI” that lets any AI client—Claude Desktop, VS Code Copilot, or your own app—talk to any tool in the same language. |
| Gateway | A hub that takes many USB-C cables (different protocols, ports, and auth schemes) and presents them to the outside world through one socket. |
Real-World Pain Points
-
You have a Python script that returns the weather on port 9000, a Node service that fetches stock prices on 9001, and a Go binary that converts currencies on 9002. -
Claude Desktop can only open one local MCP server at a time. -
Adding rate-limiting, retries, or centralized logs means editing every script separately.
Gateway Benefits
-
Protocol Unification: HTTP, WebSocket, SSE, gRPC, stdio—translated on the fly. -
Central Governance: One place for auth, throttling, retries, caching, and tracing. -
Hot Swapping: Add or remove tools via the web UI or API—no client restart needed.
2. Five-Minute Quick Start with Docker
2.1 Smallest Possible Run
docker run -d --name mcpgateway \
  -p 4444:4444 \
  -e MCPGATEWAY_UI_ENABLED=true \
  -e MCPGATEWAY_ADMIN_API_ENABLED=true \
  -e HOST=0.0.0.0 \
  -e JWT_SECRET_KEY=my-test-key \
  -e BASIC_AUTH_USER=admin \
  -e BASIC_AUTH_PASSWORD=changeme \
  ghcr.io/ibm/mcp-context-forge:0.6.0
Open http://localhost:4444/admin and log in with
username admin, password changeme.
2.2 Create an API Token
docker exec mcpgateway \
  python3 -m mcpgateway.utils.create_jwt_token \
  --username admin --exp 0 --secret my-test-key
Copy the returned JWT.
Every later curl or client call will include
Authorization: Bearer <your-JWT>.
3. Beyond the Basics: Wrap Any REST Endpoint as an MCP Tool
3.1 Scenario
You already have a local service that returns the current time:
GET http://localhost:9000/time?timezone=UTC
3.2 Use the Translator Utility
python3 -m mcpgateway.translate \
  --stdio "curl -s http://localhost:9000/time" \
  --expose-sse \
  --port 8003
The translator starts a small server that turns the curl command into an MCP Tool and exposes it on /sse.
3.3 Register the Tool with the Gateway
curl -X POST http://localhost:4444/gateways \
  -H "Authorization: Bearer <your-JWT>" \
  -H "Content-Type: application/json" \
  -d '{"name":"local_time","url":"http://localhost:8003/sse"}'
4. One Dashboard to Rule Them All: Admin UI & Virtual Servers

| Page | What You Can Do |
|---|---|
| Tools | Enable / disable individual tools in one click |
| Servers | Bundle many tools into a single “virtual server” that looks like one MCP server to any client |
| A2A Agents | Register external AI agents (OpenAI, Anthropic, custom) and expose them as MCP tools |
| Logs | Real-time, searchable logs with export |
4.2 Build a “Time Toolkit”
-
In Tools, confirm that get_system_timeexists and note its ID, e.g.6018ca46d32a4ac6b4c054c13a1726a2. -
Go to Servers → “New Server” and fill in: -
Name: time_server -
Description: Fast time tools -
Associated Tools: paste the ID above
-
-
Click save. You will receive a Server UUID, e.g. UUID_OF_SERVER_1.
4.3 Use It in Claude Desktop
Edit claude_desktop_config.json:
{
  "mcpServers": {
    "mcpgateway-wrapper": {
      "command": "python",
      "args": ["-m", "mcpgateway.wrapper"],
      "env": {
        "MCP_AUTH": "<your-JWT>",
        "MCP_SERVER_URL": "http://localhost:4444/servers/UUID_OF_SERVER_1/mcp"
      }
    }
  }
}
Restart Claude.
Now you can ask, “What time is it in Tokyo?” and Claude will call the tool automatically.
5. Observability & Troubleshooting: Logs, Metrics, Common Pitfalls
5.1 Logging Cheat Sheet
| Variable | Default | Purpose |
|---|---|---|
LOG_LEVEL |
INFO | Lowest level to print |
LOG_TO_FILE |
false | Also write to disk when true |
LOG_ROTATION_ENABLED |
false | Rotate files at 1 MB |
5.2 Tail Logs
docker logs -f mcpgateway
For JSON logs:
docker run … -e LOG_FORMAT=json …
5.3 Metrics Endpoint
curl -H "Authorization: Bearer <JWT>" http://localhost:4444/metrics
Sample output:
{
  "tool_calls_total": 42,
  "tool_errors_total": 2,
  "a2a_agents_online": 3
}
5.4 Quick-Fix Lookup
| Error Message | Cause | Fix |
|---|---|---|
bind: address already in use |
Port 4444 taken | Stop the other process or map -p 8080:4444 |
No DATABASE_URL |
Missing .env |
cp .env.example .env |
upstream connect error |
Tool down | Check health of your tool or raise TOOL_TIMEOUT |
6. Global FAQ
Q1: I’m on Windows and don’t want Docker. Is there a native way?
Yes. Install via PyPI:
python -m venv .venv
.\.venv\Scripts\Activate.ps1
pip install mcp-contextforge-gateway
$Env:MCPGATEWAY_UI_ENABLED="true"
mcpgateway --host 0.0.0.0 --port 4444
Q2: How do I add an API Key to a tool?
When you register the tool, set:
"auth_type": "bearer",
"auth_value": "your-api-key"
The Gateway will automatically attach the header Authorization: Bearer your-api-key.
Q3: Can the Gateway scale horizontally?
Yes. It supports Redis for caching and federation. Set:
FEDERATION_ENABLED=true
REDIS_URL=redis://your-redis:6379
Multiple instances will share state and discover each other.
Q4: How do I ship logs to ELK or Grafana?
Enable OpenTelemetry:
export OTEL_ENABLE_OBSERVABILITY=true
export OTEL_EXPORTER_OTLP_ENDPOINT=http://jaeger:4317
Traces will appear in Jaeger, Zipkin, or Grafana Tempo.
Final Thoughts
ContextForge MCP Gateway turns protocol translation, service governance, and visual management into a single installable package.
For developers, it feels like Postman; for architects, it behaves like an API Gateway; for AI clients, it is a plug-and-play toolbox that never goes offline.
After reading this guide you have walked from “one Docker command” to “a production-grade, observable platform” without leaving the official documentation.
Your next step is to register your first local script and experience the moment when an AI assistant talks to your own code as naturally as it talks to the public internet.

