

WhisperLiveKit: Ultra-Low-Latency Self-Hosted Speech-to-Text with Real-Time Speaker Identification
If you’re in need of a tool that converts speech to text in real time while distinguishing between different speakers, WhisperLiveKit (WLK for short) might be exactly what you’re looking for. This open-source solution specializes in ultra-low latency, self-hosted deployment, and supports real-time transcription and translation across multiple languages—making it ideal for meeting notes, accessibility tools, content creation, and more.
What Is WhisperLiveKit?
Simply put, WhisperLiveKit is a tool focused on real-time speech processing. It instantly converts spoken language into text and identifies who is speaking—this is known as “speaker identification.” Most importantly, it operates with minimal latency, delivering near-instantaneous results as you speak. Plus, you can deploy it on your own servers, eliminating concerns about data privacy.

You might wonder: Why not just use the standard Whisper model to process audio chunks? The original Whisper is designed for complete audio utterances, such as full recordings. Forcing it to handle small segments often leads to lost context, truncated words mid-syllable, and poor transcription quality. WhisperLiveKit addresses this with state-of-the-art real-time speech research, enabling intelligent buffering and incremental processing to maintain accuracy and fluency.
Core Technologies Powering WhisperLiveKit
WhisperLiveKit’s low latency and high accuracy are made possible by these cutting-edge technologies:
-
✦ Simul-Whisper/Streaming (SOTA 2025): Delivers ultra-low latency transcription using the AlignAtt policy—essentially processing speech “on the fly” without waiting for full sentences. -
✦ NLLW (2025): Built on the NLLB model, supporting simultaneous translation between over 200 languages. Whether translating Chinese to French or Spanish to Japanese, it handles cross-lingual tasks seamlessly. -
✦ WhisperStreaming (SOTA 2023): Reduces latency with the LocalAgreement policy for smoother, more consistent transcription. -
✦ Streaming Sortformer (SOTA 2025): Advanced real-time speaker diarization technology that accurately identifies “who is speaking” in dynamic conversations. -
✦ Diart (SOTA 2021): An alternative real-time speaker diarization tool, serving as a complementary backend. -
✦ Silero VAD (2024): Enterprise-grade Voice Activity Detection that precisely identifies when speech is present. It pauses processing during silent periods to conserve server resources.
Architecture: How Does It Work?
Curious how WhisperLiveKit handles multiple users simultaneously? Here’s a breakdown of its architecture:

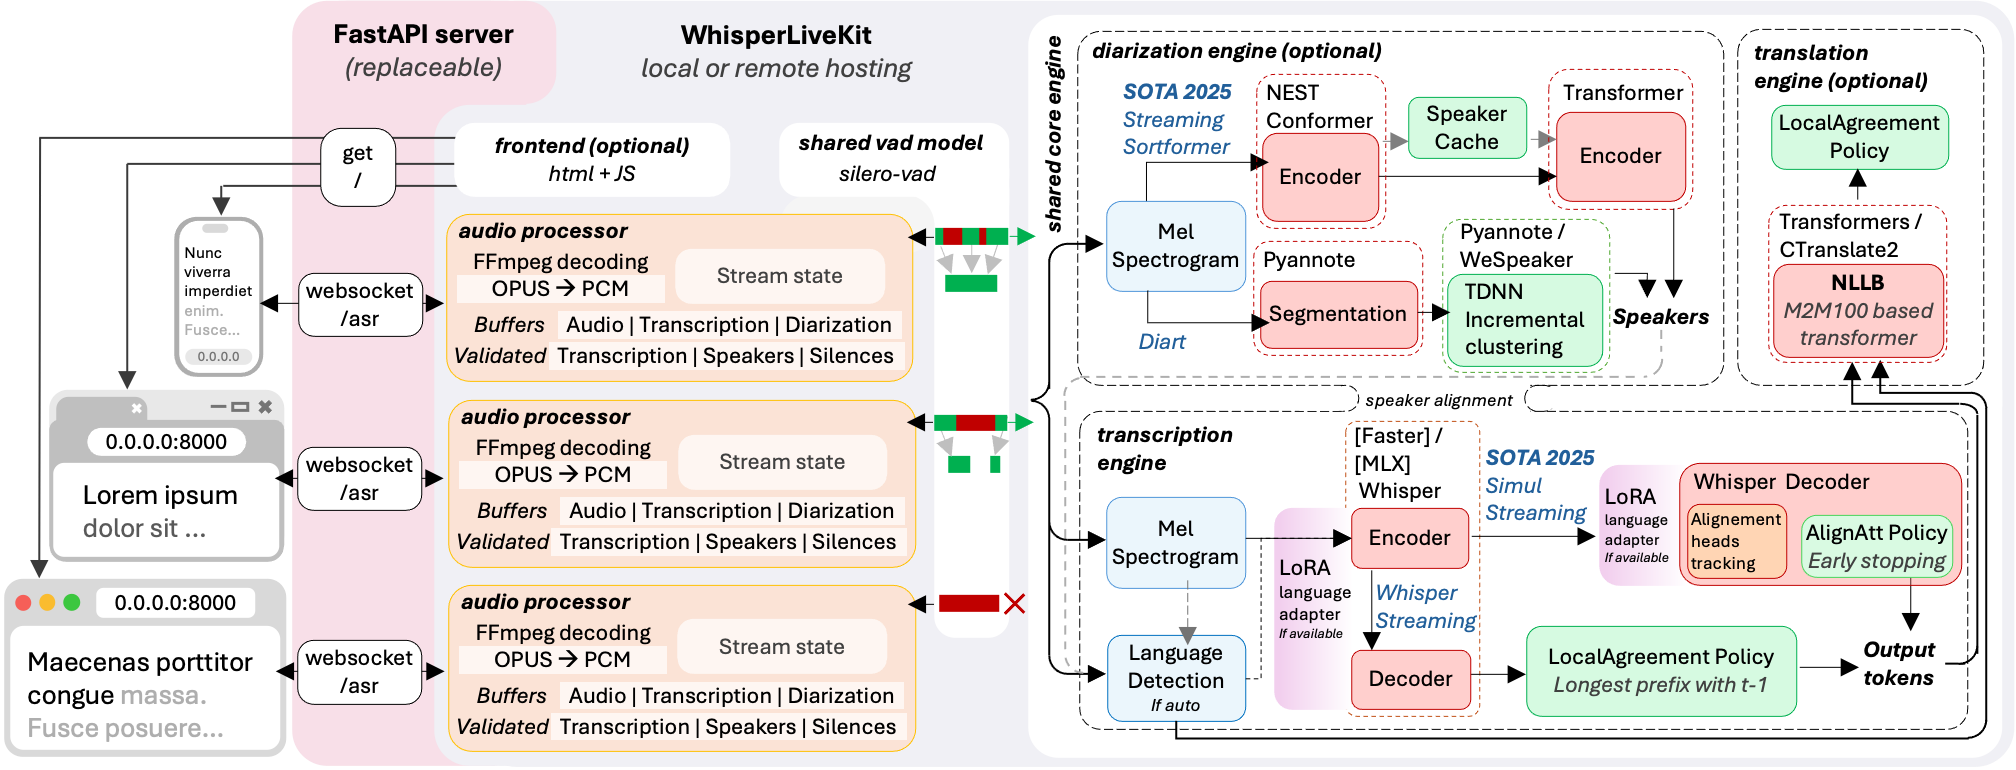
In short, the backend supports concurrent connections from multiple users. When you speak, Voice Activity Detection (VAD) first determines if audio is present—reducing overhead during silence. When speech is detected, the audio is sent to the processing engine, which converts it to text in real time. Speaker identification technology labels each speaker, and the results are instantly returned to the user interface.
Installation: Get Up and Running in 3 Steps
Basic Installation
Whether you’re on Windows, macOS, or Linux, the first step is installing WhisperLiveKit. The simplest method is using pip:
pip install whisperlivekit
For the latest development version, install directly from the repository:
# Clone the repository
git clone https://github.com/QuentinFuxa/WhisperLiveKit.git
# Navigate to the directory
cd WhisperLiveKit
# Install in editable mode
pip install -e .
Optional Dependencies: Boost Performance
Enhance WhisperLiveKit’s capabilities with these optional dependencies, tailored to your device and use case:
| Use Case | Installation Command | Ideal For |
|---|---|---|
| Windows/Linux Optimization | pip install faster-whisper |
Users on Windows/Linux seeking faster transcription speeds |
| Apple Silicon Optimization | pip install mlx-whisper |
macOS users with M-series chips (boosts local processing performance) |
| Translation Functionality | pip install nllw |
Anyone needing real-time translation alongside transcription |
| Speaker Identification (Recommended) | pip install git+https://github.com/NVIDIA/NeMo.git@main#egg=nemo_toolkit[asr] |
Enabling speaker diarization features |
| OpenAI API Support | pip install openai |
Users wanting to leverage OpenAI’s API for transcription |
| Speaker Identification (Alternative) | pip install diart |
A secondary option for speaker diarization (not recommended as primary) |
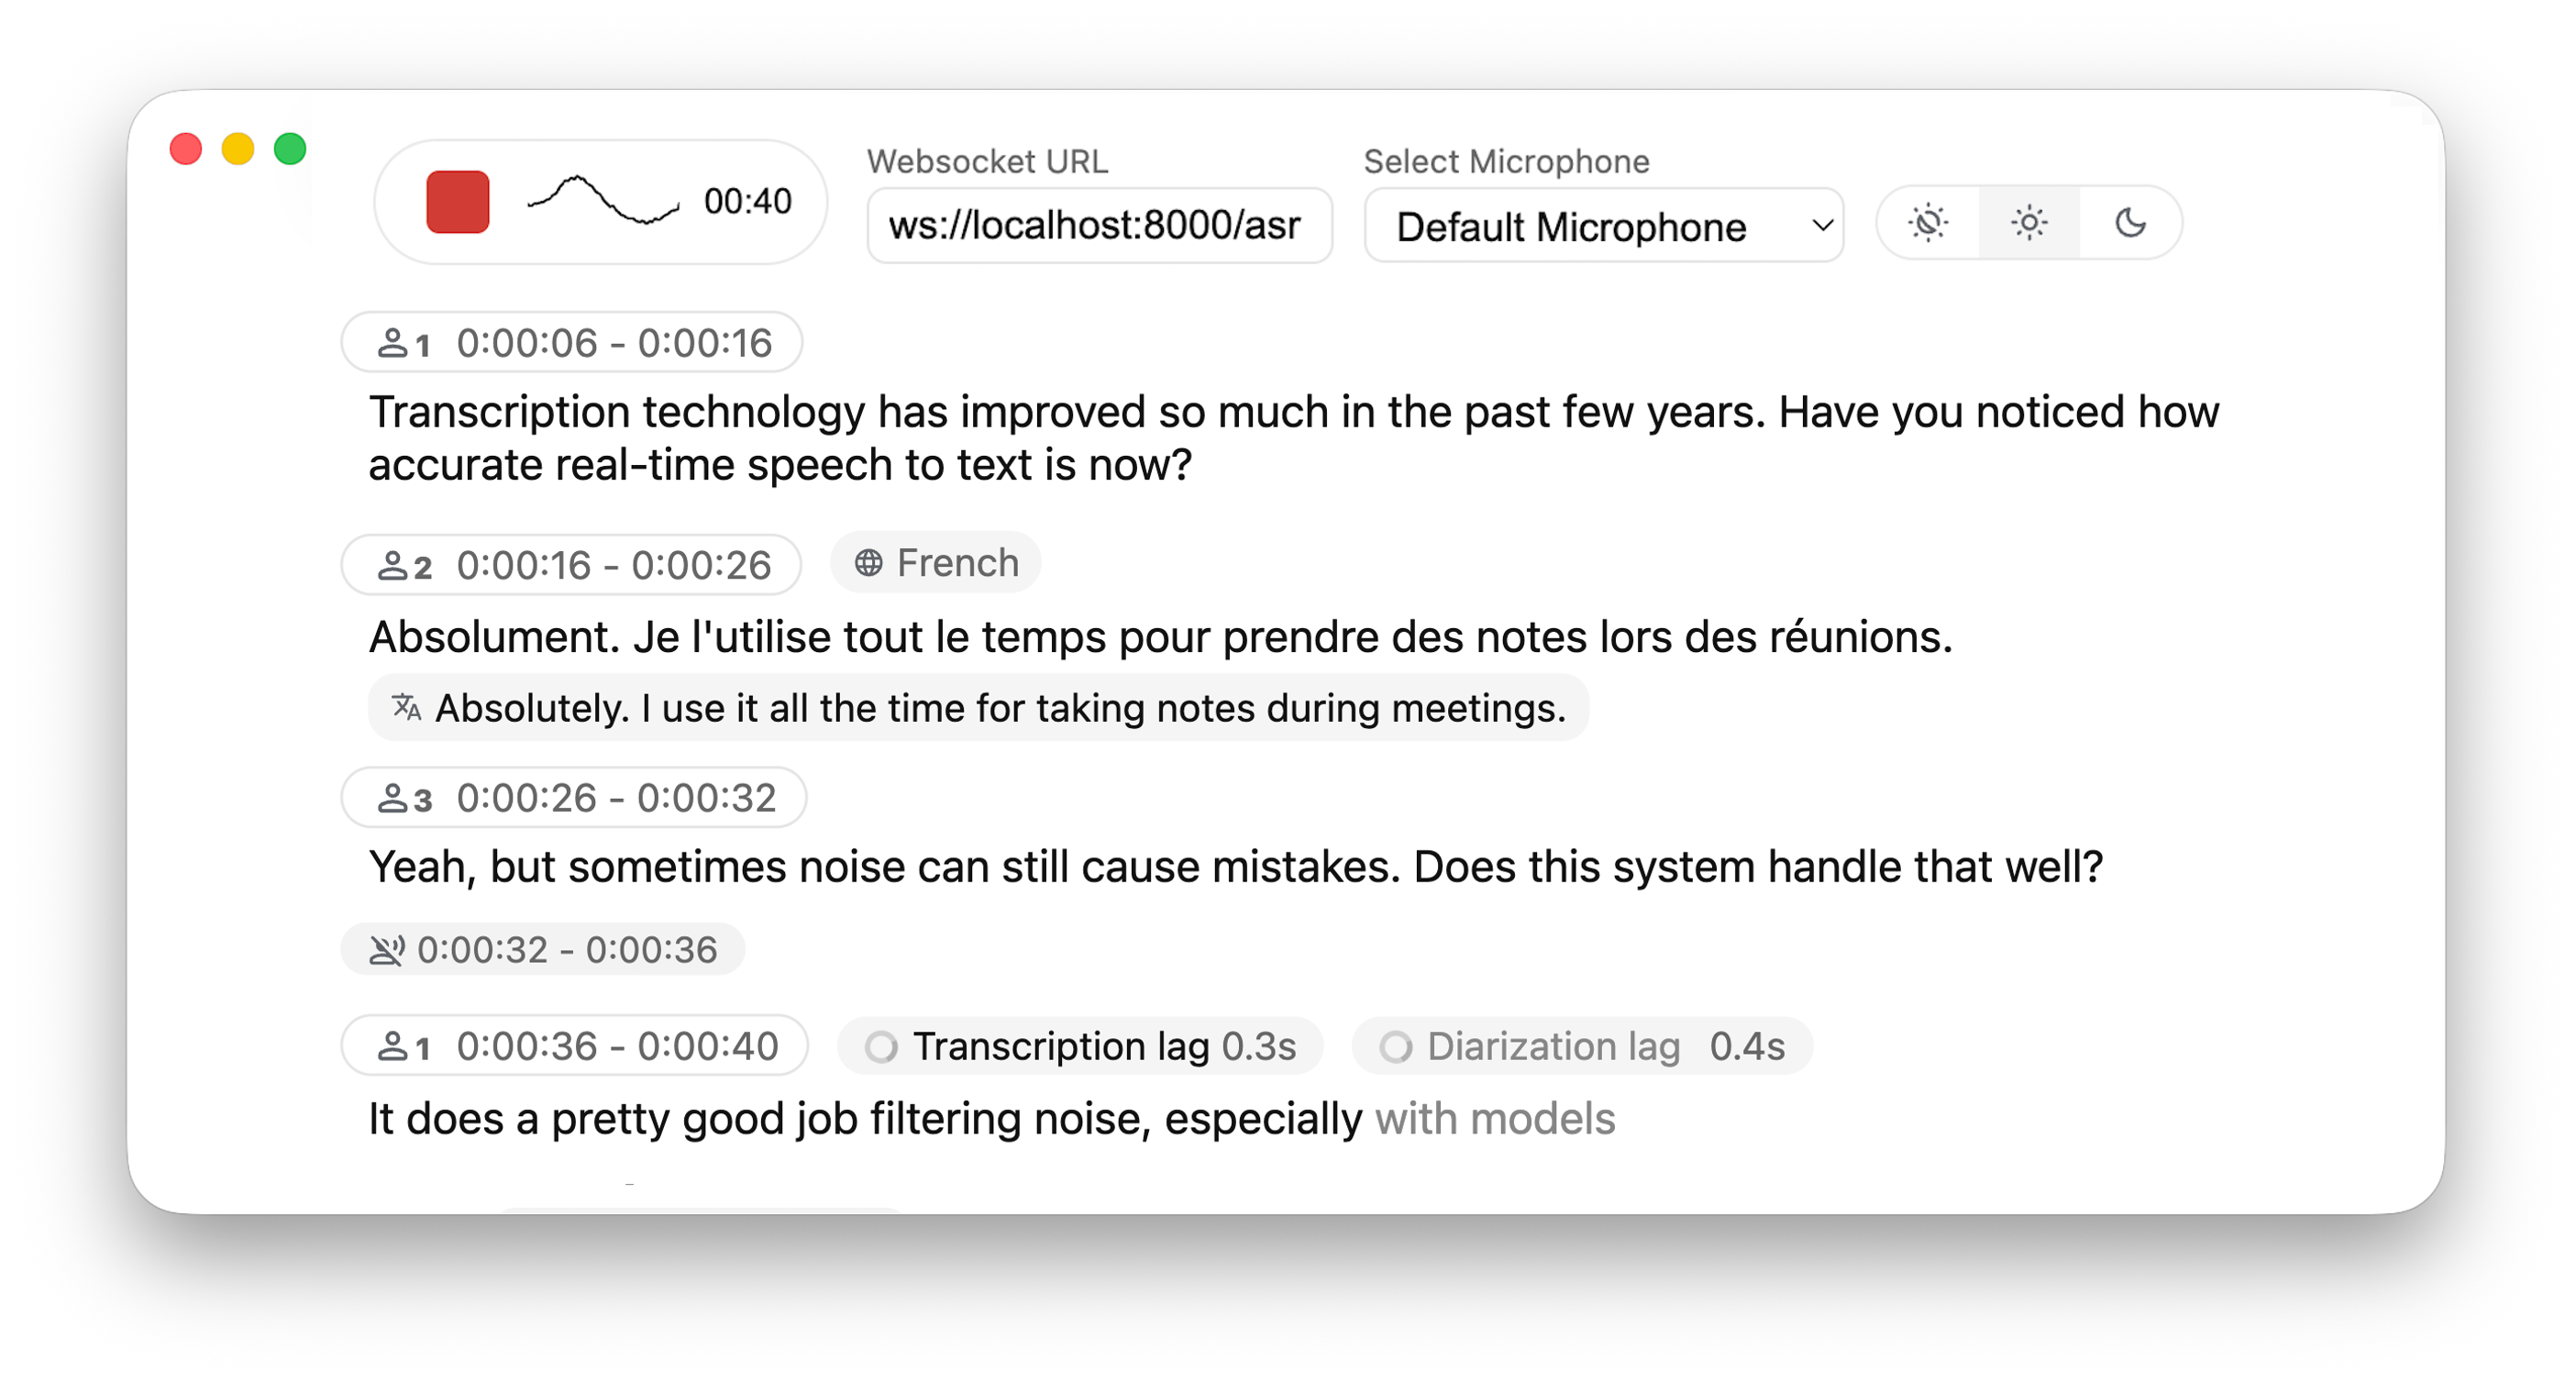
Quick Start: Experience Real-Time Transcription in 5 Minutes
Step 1: Launch the Transcription Server
Open your terminal and run the following command to start the server (using the base model and English as an example):
wlk --model base --language en
-
✦ --model: Specifies the Whisper model size (e.g., base, small, medium, large-v3). Larger models offer higher accuracy but require more computing power. -
✦ --language: Sets the target language (e.g., en for English, zh for Chinese, fr for French). View the full list of language codes here.
Step 2: Use It in Your Browser
Open a web browser and navigate to http://localhost:8000. Start speaking—you’ll see your words appear in real time. It’s that simple!
Quick Tips
-
✦ For HTTPS support (required for production environments), add SSL certificate parameters when starting the server (see the “Configuration Parameters” section below). -
✦ The CLI accepts both wlkandwhisperlivekit-serveras entry points—they work identically. -
✦ If you encounter GPU or environment issues during setup, refer to the troubleshooting guide.
Advanced Usage: Tailor to Your Needs
1. Command Line: Customize Your Transcription Service
Beyond basic setup, use command-line parameters to customize functionality. Examples include:
-
✦ Real-Time Translation: Transcribe French and translate it to Danish
wlk --model large-v3 --language fr --target-language da -
✦ Public Access + Speaker Identification: Make the server accessible on all network interfaces and enable speaker diarization
wlk --host 0.0.0.0 --port 80 --model medium --diarization --language fr
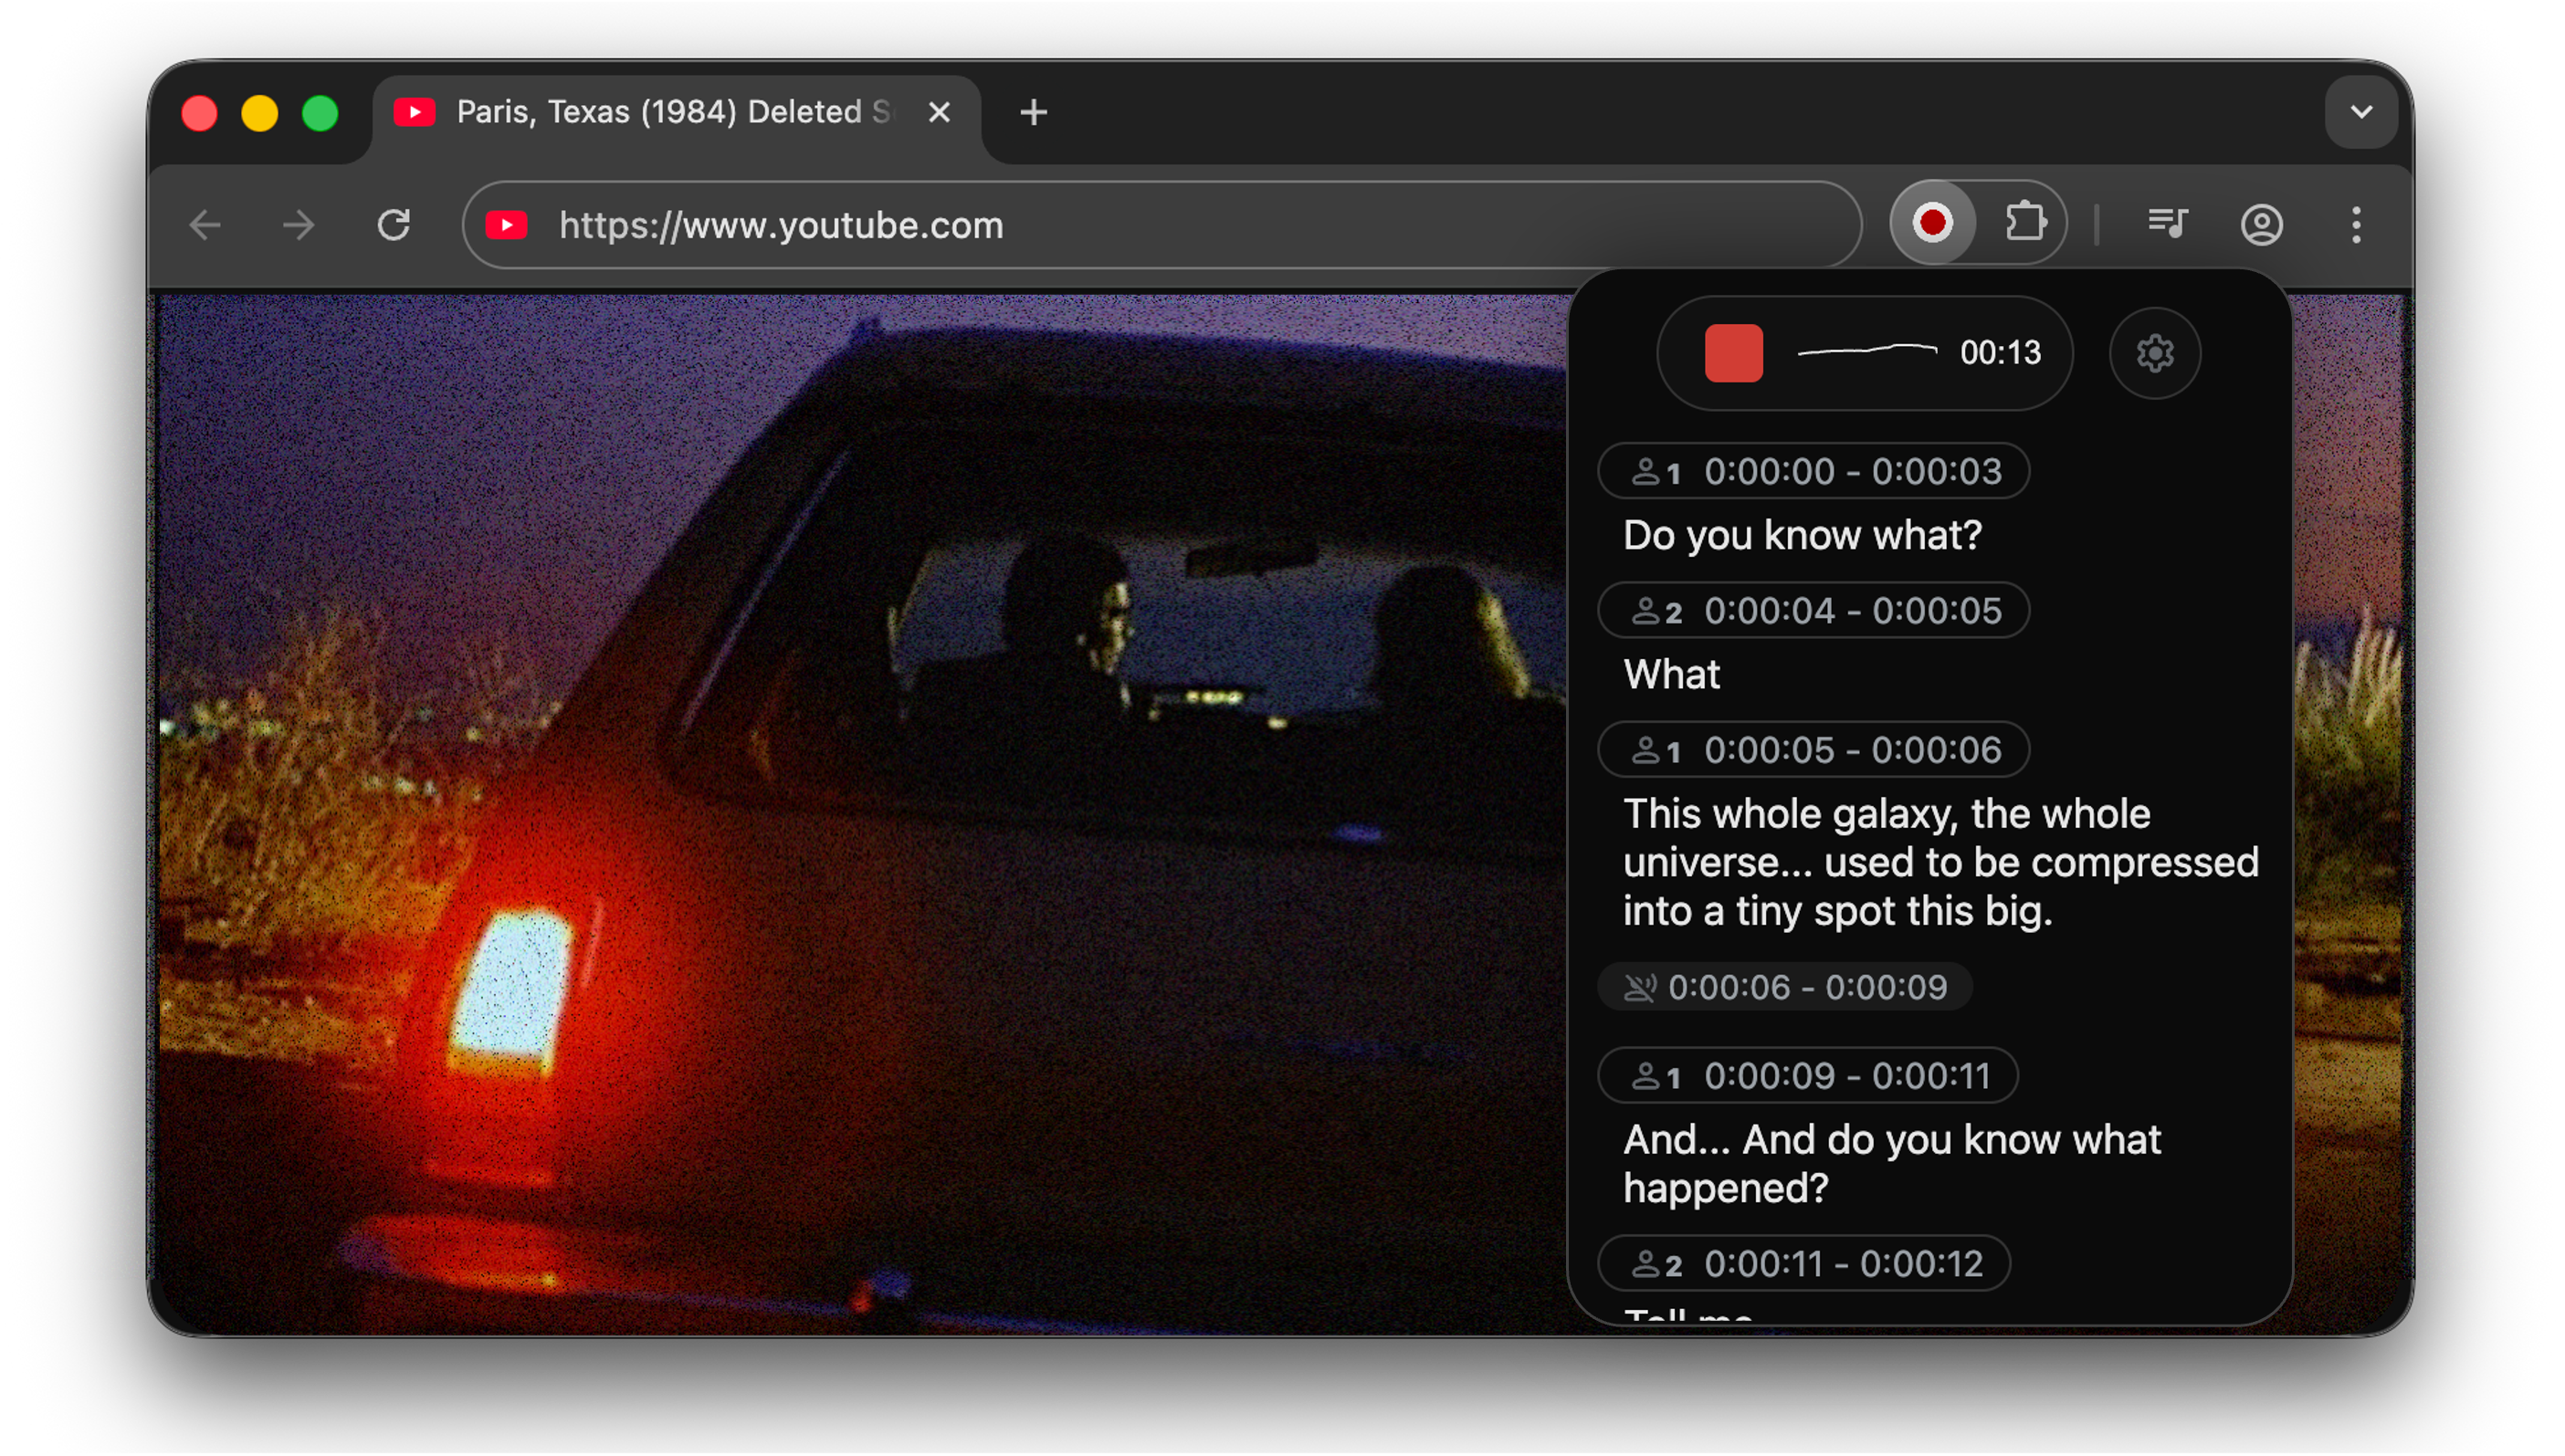
2. Web Audio Capture: Chrome Extension
Capture and transcribe audio from web pages (e.g., online meetings, webinars) using the Chrome extension:
-
Navigate to the chrome-extensiondirectory in the repository and follow the installation instructions. -
Enable the extension on the webpage you want to transcribe—audio will be captured and converted to text in real time.

3. Python API: Integrate into Your Applications
Embed WhisperLiveKit’s functionality into your Python projects using its API. Here’s a simplified example:
import asyncio
from contextlib import asynccontextmanager

from fastapi import FastAPI, WebSocket, WebSocketDisconnect
from fastapi.responses import HTMLResponse

from whisperlivekit import AudioProcessor, TranscriptionEngine, parse_args

transcription_engine = None

@asynccontextmanager
async def lifespan(app: FastAPI):
    # Initialize the transcription engine with medium model, speaker diarization, and English
    global transcription_engine
    transcription_engine = TranscriptionEngine(model="medium", diarization=True, lan="en")
    yield

app = FastAPI(lifespan=lifespan)

async def handle_websocket_results(websocket: WebSocket, results_generator):
    # Send transcription results to the frontend via WebSocket
    async for response in results_generator:
        await websocket.send_json(response)
    await websocket.send_json({"type": "ready_to_stop"})

@app.websocket("/asr")
async def websocket_endpoint(websocket: WebSocket):
    global transcription_engine

    # Create an AudioProcessor for each connection (shares the global engine)
    audio_processor = AudioProcessor(transcription_engine=transcription_engine)
    results_generator = await audio_processor.create_tasks()
    results_task = asyncio.create_task(handle_websocket_results(websocket, results_generator))
    await websocket.accept()

    while True:
        # Receive audio data and process it
        message = await websocket.receive_bytes()
        await audio_processor.process_audio(message)
For a complete example, see basic_server in the repository.
4. Frontend Implementation: Customize Your UI
WhisperLiveKit includes a pre-built HTML/JavaScript frontend in whisperlivekit/web/live_transcription.html. You can also import it directly in Python:
from whisperlivekit import get_inline_ui_html
page = get_inline_ui_html()  # Retrieve the frontend HTML code
Integrate this code into your website to get a ready-to-use transcription interface.
Configuration Parameters: A Detailed Guide
Customize WhisperLiveKit’s behavior with these parameters when starting the server:
Basic Parameters
| Parameter | Description | Default Value |
|---|---|---|
--model |
Whisper model size (see recommendations here) | small |
--model-path |
Path to a local model file or Hugging Face repo ID (overrides --model) |
None |
--language |
Transcription language (full code list here). Use auto for automatic detection (may bias toward English). |
auto |
--target-language |
Target language for translation (supports 200+ languages; list here). For English translation, use --direct-english-translation. |
None |
--diarization |
Enable speaker identification | False |
--backend-policy |
Streaming strategy: 1/simulstreaming (AlignAtt) or 2/localagreement (LocalAgreement) |
simulstreaming |
--backend |
Whisper implementation: auto (prefers MLX on macOS, then Faster-Whisper), or specify mlx-whisper, faster-whisper, whisper, or openai-api (LocalAgreement only) |
auto |
--no-vac |
Disable Voice Activity Controller (not recommended) | False |
--no-vad |
Disable Voice Activity Detection (not recommended) | False |
--warmup-file |
Path to audio file for model warmup | jfk.wav |
--host |
Server host address | localhost |
--port |
Server port | 8000 |
--ssl-certfile |
Path to SSL certificate file (for HTTPS) | None |
--ssl-keyfile |
Path to SSL private key file (for HTTPS) | None |
--forwarded-allow-ips |
IPs or IP ranges allowed for reverse proxy (e.g., 127.0.0.1, 10.100.0.0/16) |
None |
--pcm-input |
Expect raw PCM (s16le) audio input (bypasses FFmpeg; frontend uses AudioWorklet) | False |
--lora-path |
Path or Hugging Face repo ID for LoRA adapter weights (only works with --backend whisper) |
None |
Translation Parameters
| Parameter | Description | Default Value |
|---|---|---|
--nllb-backend |
Translation backend: transformers or ctranslate2 |
ctranslate2 |
--nllb-size |
Translation model size: 600M or 1.3B |
600M |
Speaker Diarization Parameters
| Parameter | Description | Default Value |
|---|---|---|
--diarization-backend |
Speaker diarization backend: diart or sortformer |
sortformer |
--disable-punctuation-split |
Disable punctuation-based segmentation (non-functional in v0.2.15/0.2.16) | False |
--segmentation-model |
Hugging Face model ID for Diart segmentation (available models here) | pyannote/segmentation-3.0 |
--embedding-model |
Hugging Face model ID for Diart embedding (available models here) | speechbrain/spkrec-ecapa-voxceleb |
SimulStreaming Backend Parameters
| Parameter | Description | Default Value |
|---|---|---|
--disable-fast-encoder |
Disable Faster Whisper/MLX Whisper encoder (slower but saves GPU memory) | False |
--custom-alignment-heads |
Use custom alignment heads (extract with scripts/determine_alignment_heads.py) |
None |
--frame-threshold |
AlignAtt frame threshold (lower = faster, higher = more accurate) | 25 |
--beams |
Number of beams for beam search (1 = greedy decoding) | 1 |
--decoder |
Force decoder type: beam or greedy |
auto |
--audio-max-len |
Maximum audio buffer length (seconds) | 30.0 |
--audio-min-len |
Minimum audio length to process (seconds) | 0.0 |
--cif-ckpt-path |
Path to CIF model for word boundary detection | None |
--never-fire |
Never truncate incomplete words | False |
--init-prompt |
Initial prompt for the model | None |
--static-init-prompt |
Static prompt that doesn’t scroll | None |
--max-context-tokens |
Maximum context tokens (varies by model; typically 448) | Model-dependent |
WhisperStreaming Backend Parameters
| Parameter | Description | Default Value |
|---|---|---|
--confidence-validation |
Use confidence scores for faster validation | False |
--buffer_trimming |
Buffer trimming strategy: sentence or segment |
segment |
Production Deployment Guide
Deploy WhisperLiveKit in production (e.g., for enterprise use or product integration) with these steps:
1. Server Setup
Install a production-grade ASGI server and launch multiple workers to handle concurrent traffic:
# Install dependencies
pip install uvicorn gunicorn
# Start server with 4 workers
gunicorn -k uvicorn.workers.UvicornWorker -w 4 your_app:app
Replace your_app:app with your Python application entry point (e.g., the basic_server example).
2. Frontend Deployment
Customize the HTML example to match your brand, and ensure the WebSocket connection points to your production domain.
3. Nginx Configuration (Recommended)
Use Nginx as a reverse proxy to handle static assets and WebSocket forwarding, improving stability:
server {
    listen 80;
    server_name your-domain.com;  # Replace with your domain

    location / {
        proxy_pass http://localhost:8000;  # Point to WhisperLiveKit server
        proxy_set_header Upgrade $http_upgrade;
        proxy_set_header Connection "upgrade";
        proxy_set_header Host $host;
    }
}
4. HTTPS Support
For secure deployments (required for most web services), use the wss:// protocol (WebSocket over HTTPS) and specify SSL certificates when starting the server:
wlk --ssl-certfile /path/to/cert.pem --ssl-keyfile /path/to/key.pem
Docker Deployment: Cross-Platform Simplicity
Avoid manual environment configuration with Docker, which supports both GPU and CPU deployment.
Prerequisites
-
✦ Docker installed on your system -
✦ NVIDIA Docker runtime (for GPU acceleration)
Quick Start
GPU Acceleration (Recommended for Speed)
# Build the Docker image
docker build -t wlk .
# Run container with GPU support (maps port 8000)
docker run --gpus all -p 8000:8000 --name wlk wlk
CPU-Only (For Devices Without GPU)
# Build CPU-specific image
docker build -f Dockerfile.cpu -t wlk .
# Run container
docker run -p 8000:8000 --name wlk wlk
Custom Configuration
Add parameters when running the container to customize behavior (e.g., model and language):
docker run --gpus all -p 8000:8000 --name wlk wlk --model large-v3 --language fr
Advanced Build Options
Use --build-arg to add customizations during image build:
-
✦ Install extra dependencies: docker build --build-arg EXTRAS="whisper-timestamped" -t wlk . -
✦ Preload model cache: docker build --build-arg HF_PRECACHE_DIR="./.cache/" -t wlk . -
✦ Add Hugging Face token (for gated models): docker build --build-arg HF_TKN_FILE="./token" -t wlk .
Memory Requirements
Large models (e.g., large-v3) require significant memory—ensure your Docker runtime has sufficient resources allocated.
Frequently Asked Questions (FAQ)
1. What languages does WhisperLiveKit support?
Transcription languages are listed here. Translation supports over 200 languages, with the full list here.
2. How do I enable speaker identification?
Add the --diarization flag when starting the server:
wlk --model medium --diarization --language zh
For the Diart backend: Accept the model usage terms on Hugging Face (segmentation model, embedding model), then log in with huggingface-cli login.
3. Which model size should I choose?
-
✦ Small models (base, small): Fast and suitable for CPUs/low-end devices (slightly lower accuracy). -
✦ Large models (medium, large-v3): High accuracy for complex audio (requires GPU for performance).
See model recommendations for details.
4. Can I use WhisperLiveKit outside a browser?
Yes. Beyond the web interface, integrate it via the Python API or use the Chrome extension to capture audio from any webpage.
5. Why is there latency in transcription?
Latency depends on model size, device performance, and network speed. Reduce latency by:
-
✦ Using a smaller model (e.g., small instead of large-v3) -
✦ Lowering the --frame-thresholdvalue (for SimulStreaming) -
✦ Enabling hardware acceleration (GPU or Apple Silicon MLX)
Use Cases: How WhisperLiveKit Adds Value
-
✦ Meeting Transcription: Real-time transcription of multi-speaker meetings with automatic speaker labeling—export text logs instantly after the call. -
✦ Accessibility Tools: Help hard-of-hearing users follow conversations in real time, bridging communication gaps. -
✦ Content Creation: Auto-transcribe podcasts, videos, or interviews to generate subtitles, scripts, or blog post drafts. -
✦ Customer Service: Transcribe support calls with speaker differentiation (agent vs. customer) for quality assurance and training.
WhisperLiveKit stands out for its low latency, self-hosted flexibility, and multilingual support. If you need a locally deployable, real-time speech processing tool, it’s well worth exploring—installation is straightforward, and its open-source nature lets you customize it to your specific needs. Whether you’re building enterprise software or a personal project, WhisperLiveKit delivers reliable, efficient speech-to-text with speaker identification.

