Google Opal: A Deep Dive into Building and Deploying AI Mini-Apps Without Code
「Core Question: How can one build, test, and deploy functional AI-powered mini-apps without writing a single line of code?」
Google Opal is an innovative platform designed to lower the barrier to entry for AI application development. It empowers any user—regardless of their coding background—to discover, build, and deploy AI “mini-apps,” known as Opals, using intuitive natural language descriptions or a visual graphical editor. These apps can chain complex AI models and tools together and offer one-click publishing, completely eliminating the hassle of server configuration and operations.
This article provides an in-depth exploration of Opal’s core features and workflows, detailing how to transform creative ideas into reality using this tool, while sharing insights on the philosophy of “no-code” AI development.
The Core Value of Opal: Why AI Mini-Apps Matter
「Core Question: What key features does Google Opal offer that make it an ideal choice for building AI applications?」
Opal’s design philosophy centers on “empowerment,” enabling everyone to become an AI application creator through three core pillars: powerful workflow chaining, true no-code operation, and instant usability.
Powerful Chaining Capabilities
Opal is not just a simple chatbot interface; it allows users to create complex, multi-step workflows. This means you can chain multiple prompts, model calls, and external tools together to form a logically rigorous application. For example, you can have the AI collect user input, use a web search tool to fetch the latest information, and finally generate a formatted report. This chain structure is the foundation for building advanced applications.
True No-Code Experience
For non-technical personnel, “code” is often the biggest obstacle. Opal solves this through its Natural Language Editor. You simply type what you want to build—just like talking to a human (e.g., “Create an app that looks up historical events based on a user’s input date and generates an image”)—and Opal automatically generates the corresponding workflow and steps for you. This interaction significantly reduces cognitive load.
Instant Deployment and Hosting
In traditional development workflows, deploying an application often involves purchasing servers, configuring environments, and handling domains. Opal handles all the backend hosting. Once your app is built, you can immediately generate a shareable link, allowing users worldwide to access your Opal app via a browser. This “what you see is what you get, what you make is what you deploy” experience drastically shortens the iteration cycle from idea to product.
❝
「Reflection and Insight」
From an industry perspective, Opal represents a significant trend in AI-native development tools: encapsulating complex LLM (Large Language Model) orchestration capabilities within an intuitive UI. In the past, we needed to write Python code to call APIs, manage context windows, and handle error retries. Now, these logic elements are abstracted into “steps” and “connections.” This shift doesn’t mean a loss of technical depth; rather, it means the liberation of creativity—developers can focus on business logic and user experience rather than the syntactical details of underlying code.❞

Getting Started: Three Entry Paths Explained
「Core Question: As a new user, how should I go about creating my first Opal app using different methods?」
Upon entering the Opal platform, you will find three distinct starting points to begin your creation journey. Whether you prefer learning by imitation, describing ideas directly, or favoring granular control, Opal offers a workflow suited to you.
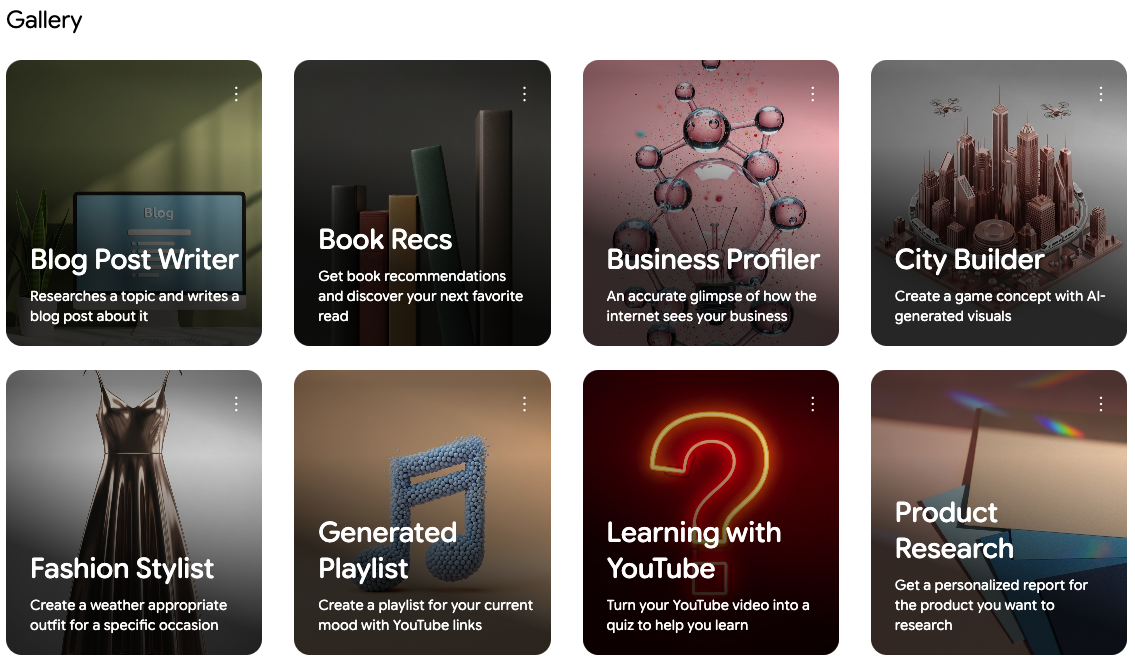
Path 1: Explore and Remix via the Gallery
For most beginners, building from scratch can feel daunting. The 「Gallery」 is an excellent starting point, showcasing Demo Opals created by Google.
-
「Browse and Select」: You can browse through various examples in the gallery, such as the “Blog Post Writer” or “Math Problem Solver.” These demos demonstrate best practices and the functional boundaries of Opal. -
「View Logic」: Click on any Opal to enter a read-only visual editor. This shows exactly how the app was built—every step and every connection is clearly visible. It’s like reading open-source code, but you understand it by looking at diagrams. -
「Remix」: This is the Gallery’s core feature. Click the 「Remix」 button, and the system will create a complete copy of that Opal for you. -
「Personalize and Modify」: In this copy, you can make changes freely without affecting the original Demo. You can try modifying prompts, adding new steps, or adjusting the output format.
「Use Case」: Suppose you select the “Blog Post Writer” Opal. You can Remix it to create a copy, then use the natural language editor to input a command: “Add a new step to create a 256×256 shareable social image based on the generated banner image, and include that social image in the blog post.” Opal will automatically update the workflow to integrate this new logic.
Path 2: Rapid Building with the Natural Language Editor
If you have a clear idea but aren’t sure how to break it down into technical steps, the Natural Language Editor is your most powerful ally.
-
「Create New Project」: Click the 「Create New」 button to enter a brand-new editing interface. -
「Describe Requirements」: In the natural language input box at the bottom of the editor, describe what you want to do in plain language. -
「Automatic Generation」: Opal will generate an initial framework containing input, generation, and output steps based on your description.
「Example Scenarios」:
-
Google Doodle Generator: “Create a Google Doodle that inputs a date, looks up a significant historical event, and generates a Google Logo to educate and inspire users.” -
Math Tutor: “Create an app that takes a screenshot of a math problem, provides a detailed description of the concept behind it, asks for user feedback, and provides a detailed solution.” -
DJ Track Generator: “Given a mood or preferences, generate a DJ track. Each song should have a witty DJ intro, plus a link to the videos on YouTube.”
With this approach, you don’t even need to know what an “LLM” or “API” is; you simply focus on your product vision.

Path 3: Fine Control with the Visual Editor
For users who want pixel-level control over their app’s logic, the 「Visual Editor」 provides the most powerful customization capabilities. It allows you to manually add, connect, and configure every step.
「Hands-on Tutorial: Building a “Birthday History Finder”」
Let’s look at a specific case to understand how to use the Visual Editor.
-
「Initialize」: Click 「Create New」 and name your project, e.g., “Birthday History Explorer.” -
「Add User Input Step」: Click the 「User Input」 button at the top. This is the starting point for interaction with the user. In the sidebar, configure the prompt, for example: “When is your birthday?” -
「Add Generate Step」: Click the 「Generate」 button. This is the brain of the app. You need to configure which AI model this step uses and what instructions to give it. -
「Establish Connection」: This is the essence of the visual editor. Drag a line from the connection point of the “User Input” step to anywhere on the “Generate” step. This tells Opal: pass the content entered by the user in the first step to the second step for processing. -
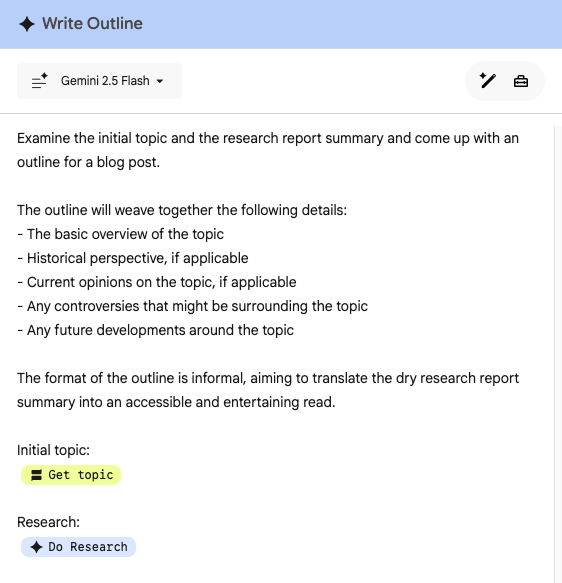
「Configure Generation Prompt」: Select the Generate step and write the prompt in the sidebar. Here, you can use the @symbol to reference the input from the previous step. For example: “The user’s birthday is @[User Input]. Use the @[Search Web] tool to find a fun and positive historical event that happened on that date.” -
「Add Output Step」: Click the 「Output」 button to decide what the user sees in the end. You can choose “webpage with auto-layout,” letting the AI decide the page layout automatically. -
「Final Connection and Configuration」: Drag a connection from the “Generate” step to the “Output” step. In the Output step’s prompt, you can request: “Based on the results from @[Search Web], generate a webpage including an image, a paragraph of explanation, and a link for more information.”
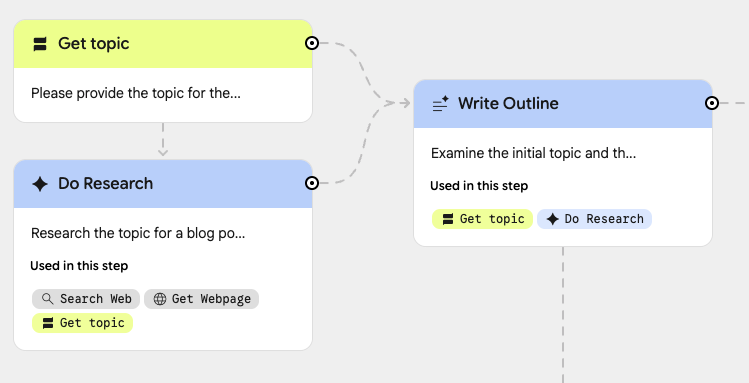
Through this drag-and-drop and connection process, the application’s logic flow becomes visually clear at a glance.
Deep Dive into Editor Features and Workflows
「Core Question: What advanced features does the Opal editor provide to help developers debug, beautify, and optimize the operational logic of AI apps?」
Mastering the basic creation process is just the first step. To build high-quality apps, you need to understand the detailed features provided by the editor, including refining step types, using assets, customizing themes, and using debugging tools.
Visual Editor: Collaboration of Steps, Assets, and Sidebar
The workspace of the visual editor is divided into three main parts: the Canvas (where steps go), the Sidebar (for configuration details), and the Bottom Bar (natural language editing).
Three Basic Forms of Steps
-
「User Input」: This is the data entry point. Besides basic text input, you can specify input types in advanced options, such as images. This is crucial for apps that need to analyze visual content (like image-based recognition apps). -
「Generate」: This is the core of the logic. Here, you select the specific AI model. More importantly, this is where “prompt engineering” happens. You can reference previous steps, tools, or static assets here. -
「Output」: This is the data exit point. You can choose to generate a dynamic webpage (where the AI decides the layout), a manually laid-out webpage, or even export directly to a Google Drive spreadsheet. This flexibility allows Opal to act not just as a chatbot, but as a data generation tool.
Referencing Assets and Tools
When building complex apps, the AI may need some additional context.
-
「Static Assets」: You can upload images or files, or even provide YouTube video links as static background knowledge. For instance, if you are building a Q&A bot based on specific company documents, you can upload the document as an asset and reference it in a generation step. -
「Tools」: Opal has a rich set of built-in tools, such as Web Search, Map Search, and Weather Query. In your prompts, use the @symbol to invoke these tools. This gives the AI the ability to “access real-time information,” solving the issue of LLM knowledge lag.
The Sidebar’s Multiple Identities
The sidebar is the control center, and its content changes based on your selection:
-
「Preview Mode」: By default, the sidebar allows you to preview the app in real-time. This “what you see is what you get” feedback loop is highly efficient. -
「Theme Mode」: You can customize the app’s appearance here. You can generate a theme randomly, or describe it using natural language, such as “Sci-fi claymation style cats.” Generated themes are saved so you can switch between them, but manual CSS adjustments are not supported. This limits freedom but ensures design consistency.
❝
「Reflection and Insight」
While using Opal, I deeply appreciated the design beauty of “References.” In traditional programming, we need to pass data through variable names; in Opal, the@symbol and visual lines essentially do the same thing—data binding. However, Opal visualizes it. For beginners, seeing a line connecting A to B is much more intuitive than understanding thatvariable_Ais passed tofunction_B. This design is not just a simplified interface; it is a cognitive mapping that aligns with human intuition.❞
Debugging and Testing: Using the Console to Troubleshoot
「Core Question: When the running results of an AI app do not meet expectations, how can one effectively debug and locate issues using the console tool?」
Even the most experienced developers cannot guarantee code runs perfectly on the first try, let alone with AI applications. Since model generation is stochastic, debugging is particularly important. The 「Console」 feature provided by Opal is the developer’s “X-ray vision.”
-
「Access the Console」: Select the 「Console」 tab in the sidebar. -
「Step-by-Step Execution」: Click the 「Start」 button, and the app will run from the beginning. The console lists every step’s execution status in order, including execution time. -
「Single-Step Debugging」: If you want to test specific logic, you can click the 「Play」 icon directly on a specific step. This allows you to skip preceding steps and debug the current generation logic directly. -
「View Detailed Data」: Click to expand the step details in the console. You can see the complete Prompt sent to the model, the raw output of the model, the thought process, and the specific requests and returns of tool calls.

「Debugging Scenario Example」: Suppose your “Birthday History Finder” returns incorrect information. Through the console, you can check the “Model Input” of the Generate step to confirm if the @[Search Web] tool actually returned correct historical event data, or if the model hallucinated while generating the webpage. This transparency is key to optimizing AI apps.
Publishing, Sharing, and Version Management
「Core Question: After app development is complete, how can one make it accessible to users through sharing and publishing features, and how can one effectively manage the app’s version iterations?」
When you are satisfied with your app in the editor, the next step is to let it go out into the world. Opal provides flexible permission management and version control mechanisms, ensuring you can collaborate safely and iterate calmly.
Preview, Share, and Publish Differences
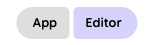
In the Opal interface, you can toggle between 「App」 view and 「Editor」 view. This is just preview mode; actual distribution involves two concepts: 「Share」 and 「Publish」.
-
「Share」: This is a collaboration feature. When you click 「Share app」, you can invite specific people to view or edit your Opal. 「Please note, those shared with can see all Prompts and logic structures inside the app.」 This means sharing is usually for internal team development or demonstrating implementation details to technical partners. -
「Publish」: This is a feature for end-users. Publishing generates a public link that users can click to run the app. In this mode, users only see the input and output interfaces and cannot see the underlying Prompts or logic. -
「Permissions and Unpublishing」: You can check permissions inside 「Share App」 settings. Additionally, you can 「Unpublish」 the app at any time, which will cause previous links to fail and return an error page. -
「Storage Mechanism」: All Opal apps are actually stored as files in your Google Drive. This also means your data security and privacy are protected by the same security system as Google Drive.
Version History: The Magic of Time Travel
During the iteration process, it is inevitable that you might “break” a function or want to revert to a previous moment of inspiration. Opal’s version history feature provides this safety net.
-
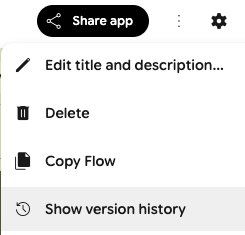
「View History」: Click the three-dot menu in the top bar and select 「Show version history」. You will see a list of versions arranged chronologically. -
「Compare and Trace Back」: Click any version in the list, and the canvas will revert to that moment’s state. You can view how the steps were connected at that time. -
「Restore Version」: Select the target version and click 「Restore this version」. -
「Important Note」: The restore operation will 「permanently delete」 all version records after the current version. This is a destructive operation. For example, if you restore from Version 3 to Version 1, Versions 2 and 3 will no longer exist. Therefore, before performing a restore, be sure this is what you want.
❝
「Reflection and Insight」
The “destructive restore” mechanism of version control is uncommon in traditional software development (where Git usually allows arbitrary rollback without losing intermediate commits), but it is understandable in lightweight tools for the mass market. It simplifies the data model but also places higher demands on users: before every major change, one should consciously make a “mental backup” or keep a copy via Remix. This also reminds us that while enjoying the convenience of no-code tools, we still need to maintain good engineering habits, such as creating different Opal files for different experimental directions instead of repeatedly overwriting in the same file.❞
Conclusion
Google Opal encapsulates complex AI orchestration capabilities within visual and natural language interaction interfaces, successfully lowering the barrier to AI application development. Whether learning from others’ experience via the Gallery, rapid prototyping via natural language, or fine-tuning via the visual editor, Opal offers a flexible and powerful workflow.
Its built-in debugging tools, theme generator, and version control mechanisms demonstrate that this is not just a toy, but a platform with production potential. For product managers, designers, or entrepreneurs, Opal is the fastest path to validating AI ideas; for developers, it is an efficient sandbox for exploring new logic and orchestration patterns.
As AI technology becomes ubiquitous, tools like Opal will reshape the boundaries of software development—the future “developer” may no longer need to be proficient in code syntax, but rather in logic construction, prompt design, and an understanding of AI model behavior.
Practical Summary / Action Checklist
-
「Quick Start」: Log in to the Opal platform, browse the 「Gallery」, find an interesting Demo, and click 「Remix」 to create a copy for your first modification. -
「Natural Language Build」: Click 「Create New」 and type your desired function directly in the bottom input box (e.g., “Help me generate an app that recommends outfits based on the weather”), and wait for Opal to auto-generate the framework. -
「Manual Fine-Tuning」: In the visual editor, add 「User Input」 to collect info, add 「Generate」 steps to call models (use @to reference inputs and tools), and add 「Output」 steps to display results. -
「Logic Connection」: Use the mouse to drag connection points between steps, or use the @symbol in prompts to establish the data flow logic chain. -
「Debug App」: Open the 「Console」 in the sidebar, click 「Start」 to run the full process, or click the play button on a single step for local testing. -
「Publish & Share」: Click 「Share app」 to set collaborator permissions; click 「Publish」 to generate a public link. -
「Version Management」: Before modifying critical functions, use the three-dot menu to check 「Show version history」 and revert to a stable version if necessary (note that restoring deletes subsequent versions).
One-page Summary
| Feature Module | Core Action | Key Tips / Notes |
|---|---|---|
| 「Creation Methods」 | Gallery Remix | Learning existing best practices; Remixing and modifying is the most efficient learning path. |
| Natural Language Description | Best for 0-to-1 prototyping; the more specific the description, the more accurate the generation. | |
| Visual Editor | Best for fine-grained logic control; manual connections ensure correct data flow. | |
| 「Step Types」 | User Input | Can be configured for text or image input; the data entry point for the app. |
| Generate | Core logic; use @ to reference steps, invoke tools, and reference assets. |
|
| Output | Supports Web pages or Google Drive export; determines the final presentation form. | |
| 「Editor Features」 | Sidebar | Changes based on selection: Preview (app view), Theme (appearance), Step (details). |
| Theme Customization | Supports natural language description to generate themes (e.g., “Cyberpunk style”), saved for switching. | |
| Console | Used for debugging; view model inputs/outputs and thought processes to locate issues. | |
| 「Publishing Mgmt」 | Share | For team collaboration; 「exposes internal Prompts and logic」. |
| Publish | For end-users; generates a public link; shows only the interactive interface. | |
| Version History | Supports rollback, but 「restoring an old version permanently deletes new version records」; proceed with caution. |
FAQ
「Q1: Can I use Opal if I know absolutely nothing about programming?」
A: Absolutely. Opal is designed specifically for no-code use. You can describe what you want to do directly in natural language (Chinese or English), and the platform will automatically build the app; or you can modify existing templates directly in the Gallery.
「Q2: Can I charge for the mini-apps generated by Opal?」
A: Based on current documentation, Opal handles hosting and publishing. The documentation does not mention specific monetization or paywall feature restrictions, focusing primarily on creation, sharing, and link generation. For specific commercial usage terms, please refer to Google’s latest service agreements.
「Q3: In the visual editor, if I don’t drag a line to connect, can I just use @ to reference in the prompt?」
A: Yes. Dragging a line and using @ references in the prompt are functionally equivalent. Dragging a line automatically adds a reference in the prompt, and vice versa. You can choose either method based on your preference.
「Q4: How can I make my Opal app look more personalized?」
A: Utilize the “Theme” function in the sidebar. You can input specific visual style descriptions, such as “Pixel art game interface” or “Minimalist black and white style,” and Opal will automatically generate corresponding UI themes for you to choose from.
「Q5: If I find the Opal generated version is worse than a previous one, how do I revert?」
A: Click the three-dot menu in the top right, select “Show version history,” browse and click the older version you are satisfied with, then click “Restore this version.” Please note this deletes all modification records after that version.
「Q6: Can Opal apps access real-time internet information?」
A: Yes. In a Generate step, use the @ symbol to invoke tools and select “Search Web” or “Search Map.” The AI can then fetch real-time data to generate responses.
「Q7: Where is my Opal data stored?」
A: Your Opal app files are stored in your personal Google Drive, so you can manage them just like normal documents.
